
Intro To MongoDB
View more presentations from Alex Sharp.
The people at Teach Me to Code have published a 3 part screencast about MongoDB. The episodes are covering the following aspects:
You can watch the complete series below (episodes are 13min, 21min and respectively 10min long. Also make sure you check Michael Dirolf’s Introduction to MongoDB.
The videos are also available for download (see the reference section). And you can always watch more NoSQL videos by using the video tag.
PivotalLabs has published a video of Michael Dirolf’s presentation: ☞ Introduction to mongoDB in which the he covered:
PivotalLabs is offering both the ☞ video and audio files for download.
Rails 2.3+ and Rails 3 rely on Rack, a minimal (and awesome) interface between Ruby and webservers. This has many advantages, one of which is the ability to easily swap Rack applications (middlewares) in & out of your Rails app. Modularity FTW!
One fun (and useful) example of a Rack middleware is a Firebug logger written by Simon Jefford for the CodeRack competition. This middleware allows you to send arbitrary messages directly to Firebug. Why? Since you’re already debugging much of your Rails app in a browser anyway, sending debug output to your browser’s console (instead of tailing a log file) makes a lot of sense.
NOTE: FirebugLogger plays nice with WebKit’s Web Inspector as well.
Simon also released a Rails plugin that you can install to set up the middleware for you, but it’s more fun (and informative) to set it up yourself.Bluepill is a pure-ruby process monitoring library similar to god/monit. Unlike god, bluepill doesn’t leak memory (according to the bluepill authors anyway :] .)
To set up delayed_job, please have a look at this asciicast (note that you should use the collectiveidea-delayed_job fork for this!)
http://rails.co.za/2009/11/14/monitoring-delayed-job-with-bluepill.html
RequireJS loads plain JavaScript files as well as more defined modules. It is optimized for in-browser use, but it can be used in other JavaScript environments, like Rhino. It implements the CommonJS Transport/C proposal API.
RequireJS uses plain script tags to load modules/files, so it should allow for easy debugging. It can be used simply to load existing JavaScript files, so you can add it to your existing project without having to re-write your JavaScript files.
RequireJS includes an optimization tool you can run as part of your packaging steps for deploying your code. The optimization tool can combine and minify your JavaScript files to allow for better performance.
If the JavaScript file defines a JavaScript module via require.def(), then there are other benefits RequireJS can offer: better CommonJS support and loading multiple versions of a module in a page. RequireJS also allows for module modifiers and has a plugin system that supports features like i18n string bundles and text file dependencies.
RequireJS does not have any dependencies on a JavaScript framework. It is tri-licensed -- BSD, MIT, and GPL.
The core require.js file around 3.5KB when minified via Closure Compiler and gzipped. require.js can also be built without some features, with the smallest option (just dependency tracking and simple module loading) weighing in at 2.4KB minified, gzipped.
The unit tests work in IE 6+, Firefox 3.0+, Safari 4+, Chrome 3+, and Opera 10+.
Ruby Enterprise Edition (REE) is a server-oriented distribution of the official Ruby interpreter, and includes various additional enhancements, such as:
REE can be easily installed in parallel to your existing Ruby interpreter, allowing you switch to REE with minimal hassle or risk. REE has been out for about a year now and is already used by many high-profile websites and organizations, such as New York Times, Shopify and 37signals.
“We switched to enterprise ruby to get the full benefit of the [copy-on-write] memory characteristics and we can absolutely confirm the memory savings of 30% some others have reported. This is many thousand dollars of savings even at today’s hardware prices.”
– Tobias Lütke (Shopify)
Ruby Enterprise Edition is 100% open source.
-Os -fno-strict-aliasing. -fno-strict-aliasing was used to avoid improper code generation by GCC 4.4. This was actually caused by some aliasing bugs in Ruby’s util.c source file. The problems have been fixed in 1.8.7-p174 so we’ve now removed this compilation flag, allowing for better compiler optimizations.
It turned out that -O2 yields better performance than -Os in many production environments, though some microbenchmarks might indicate otherwise. Therefore we’ve now replaced -Os with -O2.
We’ve submitted a patch upstream. This patch is also applied in this REE release.
Please note that the zero-copy context switching patch set is disabled by default, and must be explicitly enabled by passing –fast-threading to the installer. It is currently still marked as experimental because there are some known issues with the Kernel::fork method. Issue #9.
Please note that although the binaries are larger, this does not affect performance in any way. The debugging symbols are only used for debugging and introspection purposes and do not affect the runtime behavior of Ruby at all.
The Ubuntu packages include developer documentation.
To install Ruby Enterprise Edition, please visit the download page. To upgrade from a previous version, simply install into the same prefix that you installed to last time. Please also refer to the documentation for upgrade instructions.
http://blog.phusion.nl/2010/01/20/ruby-enterprise-edition-1-8-7-2010-01-released/
This release fixes a regression that appeared in 2.2.10 which only affects Apache. When under high load, Apache might freeze and stop responding to requests. The regression was caused by an attempt in 2.2.10 to fix various file descriptor passing problems. The fix introduced a race condition in one of the Phusion Passenger components, and since the problem only occurs under certain high-concurrency workloads it escaped our last release testing.
This problem does not affect Nginx; you only have to upgrade if you’re using Apache.
More information about the problem can be found at the following discussion thread: http://groups.google.com/group/phusion-passenger/t/d5bb2f17c8446ea0
Please install it with the following command:
gem install passenger
Next, run:
passenger-install-apache2-module
Or, if you’re an Nginx user:
passenger-install-nginx-module
Please don’t forget to copy & paste the Apache/Nginx config snippet that the installer gives you.
John Leach from Brightbox has kindly provided an Ubuntu 8.04 package for Phusion Passenger. The package is available from the Brightbox repository which you can find at:
http://apt.brightbox.net
Add the following line to the Third Party Software Sources:
deb http://apt.brightbox.net hardy main
(The simplest way to do that is to create a file in /etc/apt/sources.list.d/ containing the deb instruction, and then run ‘apt-get update’).
Once you’ve done this then you can install Phusion Passenger by running:
sudo apt-get install libapache2-mod-passenger
-or-
sudo apt-get install nginx-brightbox
(Note that John is currently packaging 2.2.11, so it might take a while before this release shows up in the apt repository.)
Phusion Passenger is provided to the community for free. If you like Phusion Passenger, please consider sending us a donation. Thank you!
http://blog.phusion.nl/2010/03/05/phusion-passenger-2-2-11-released/
After setting up MacRuby as described in our previous blog post and having set up Xcode, it is now time to create our very first Mac application in Ruby. In this series of articles, we assume that you have the latest version of OS X installed on your Mac. By the time of this writing, that is Snow Leopard and it is important to emphasize this seeing as some Cocoa API methods have been deprecated or added since its last iteration. Without further ado, allons-y!
After starting up Xcode:
A dialog window as shown below should appear.
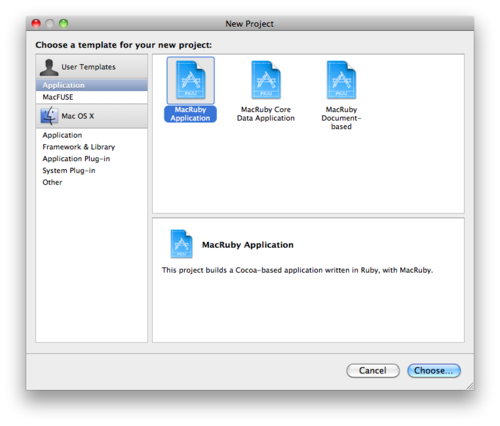
From this window
A file save dialog should now appear as displayed below.
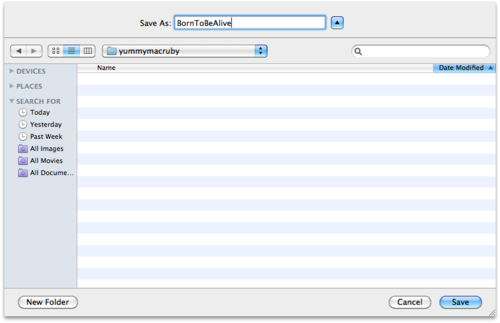
In this window:
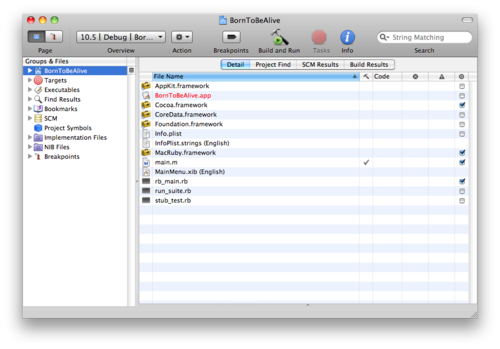
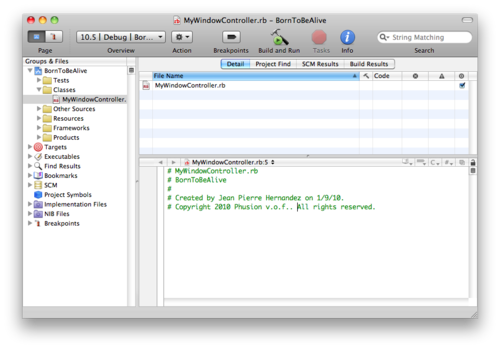
A new window should now appear representing the newly created project in the Xcode environment.
By the time of this writing our environment is setup to target OS X 10.5 (Leopard). As mentioned before, we’re going to target OS X 10.6 (Snow Leopard) seeing as we want to utilize the most mature Cocoa API and platform. As such we need to set this target environment to OS X 10.6 in the overview popup menu.
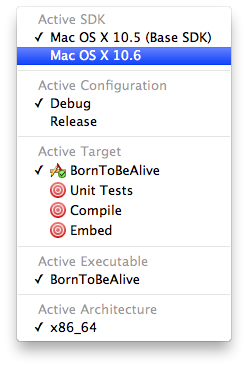
Now that that’s been dealt with, we can finally really start working on our application.
Before we’re going to write even a single line of code, let’s first start off by designing the user interface to our application. To do this, we first need to discuss how our programming environment deals with this kind of information.
Certain information about our interfaces, in particular the one’s we’ve created using Interface Builder (the UI design application of Xcode) are usually stored in bundles called NIB files.
As of Xcode 3, these are actually stored in files with the xib file extension as opposed to the nib file extension. Worry not however, as they are just different formats for storing the same information: where xib files appear to be represented as XML text files, a nib file is an archive. More importantly however, the difference between xib and nib files are that the former will be compiled within the executable and will not appear in the final .app bundle.
In general, Xcode will ultimately know what to do with these files and how to treat them. It is for this reason that we’ll refer to both formats as nib files and basically assume no distinction between them.
In the Groups & Files panel, expand the NIB Files group.
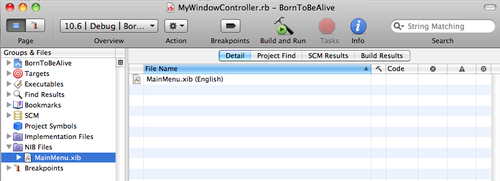
In this panel
This action should result in Interface Builder firing up for this MainMenu.xib file. Various windows of Interface Builder should now be visible to you.
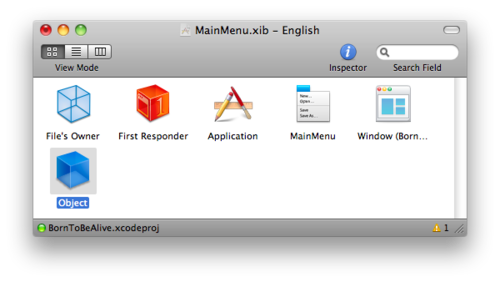
In the MainMenu.xib window:
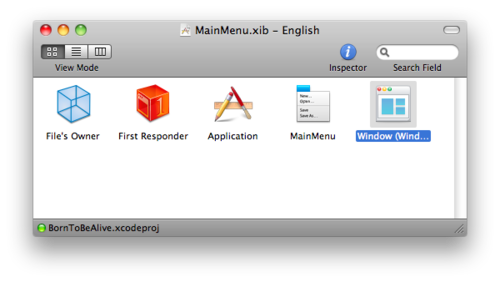
You see a collection of objects and proxy objects that are necessary for describing our user interface. The objects displayed in this window are objects that describe our application’s user interface and are stored in a freeze dried manner, i.e. serialized. Upon loading the NIB file, they get thawed and instantiated again.
In light of this, it is considered good practice to store only one window object per nib file. This way, we only load in the windows when we really need them (thus conserving memory) and will keep our design more maintainable too as each window and its components will be contained by its own NIB file. The latter will allow us to possibly recycle NIB files too in other projects.
Strictly speaking, we also shouldn’t store a window in our MainMenu.xib as is now the case, but in order to load this in, we require a notion of delegates. The latter is something we’ll discuss in a later article so for now, we’ll keep the window object in MainMenu.xib.
For now:
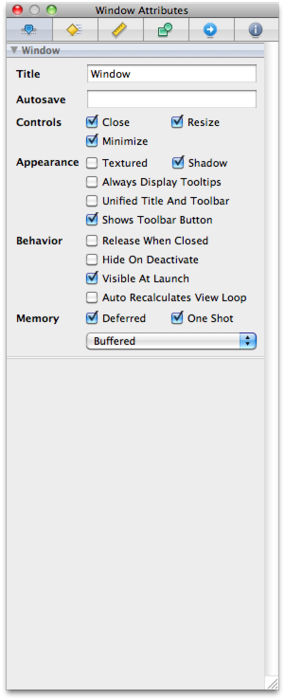
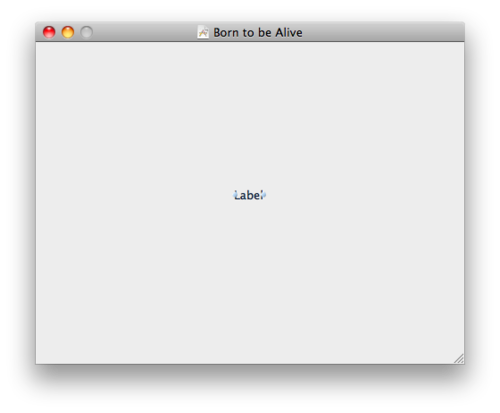
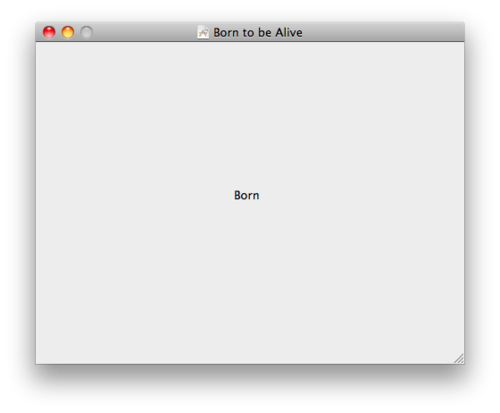
This should put the focus on our initial window and via the inspector, we can edit some of its properties, such as the title of the window instance.
While having selected the Window in the MainMenu.xib window, in the inspector window:
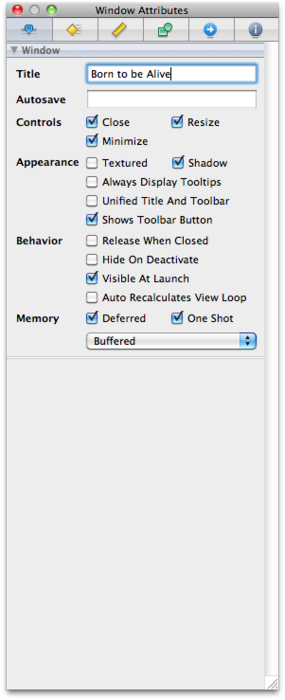
Your window should now bare the title Born to be Alive. How exciting!

Let’s add a Label to this window proclaim this message of life even bigger. To add cocoa components to our window, we need to drag and drop them from our Library panel to the window we want to add them to.
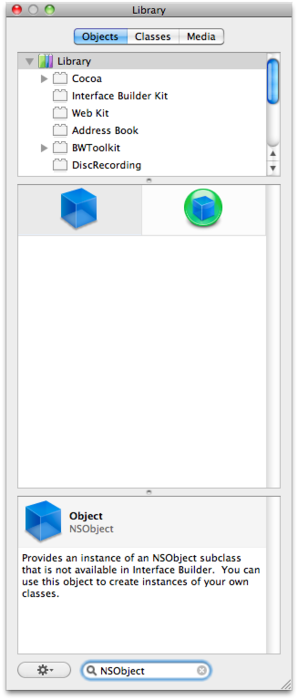
In the Library panel: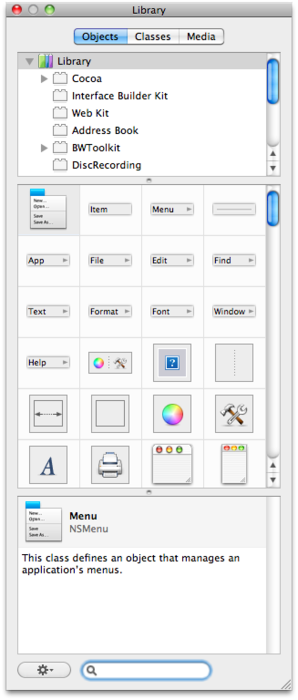
Your Library panel should now display a few options for labels and should look something like the following:

Note that my Library panel will most likely display more options here in terms of labels as I’ve also installed the BWToolkit palette too. We won’t be using any of those components for our MacRuby applications though, so it’s safe for you to ignore them for now.
Now it’s time to actually add the Label component to our window. As mentioned earlier on, we do this by simply dragging and dropping the Label icon from our Library panel to the window we want to add it to. Doing so should result in something similar to the following:
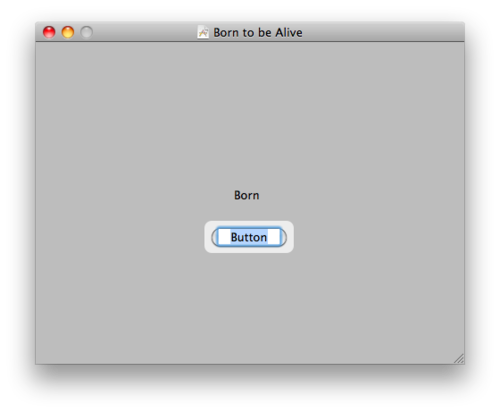
Great! Let’s rename the newly added Label to something more fitting. In the window displayed above:
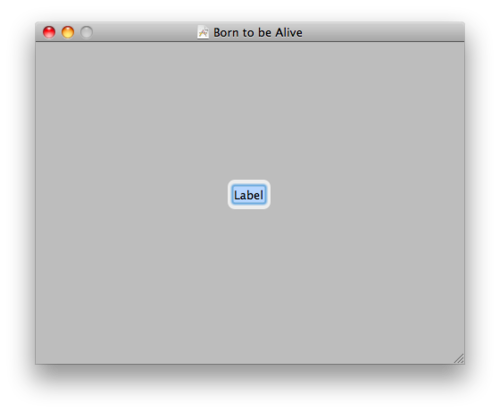
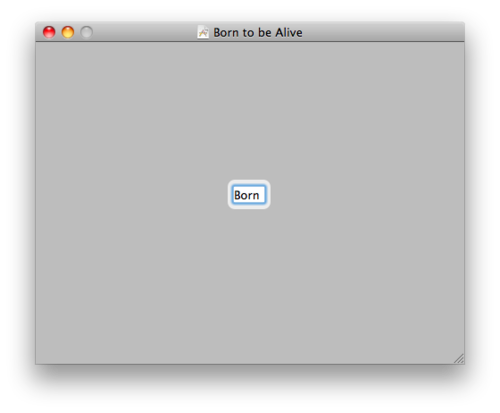
Your window should now look something like this:
Wouldn’t it be fun if we would have a button that we could press to unveil the full message of life? Let’s do just that by adding a button to the window we’re designing.
In the Library panel:

Whoah, so many buttons! Let’s just stick with the first shiny one for now.
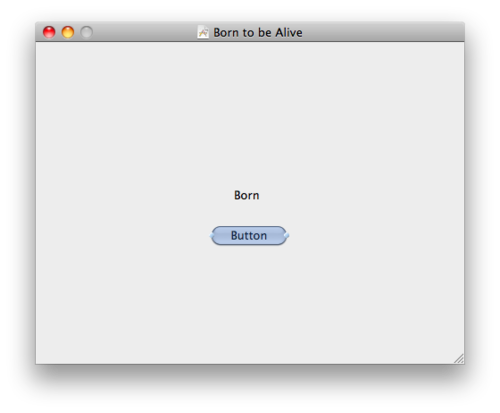
Your window should now be shaping up pretty nicely and look something like:

We can actually build this project at this stage and see what we’ve just designed in the form of a real application! Indeed, the standard MacRuby cocoa template has set up most of the boilerplate to get us started. At a later stage, we’ll dive into the details of the bootstrapping process, but for now let’s just assume that it set it up all correctly and save our changes by selecting File->Save from the Interface Builder main menu.
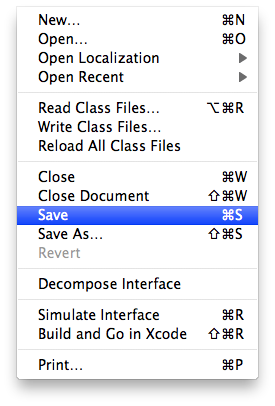
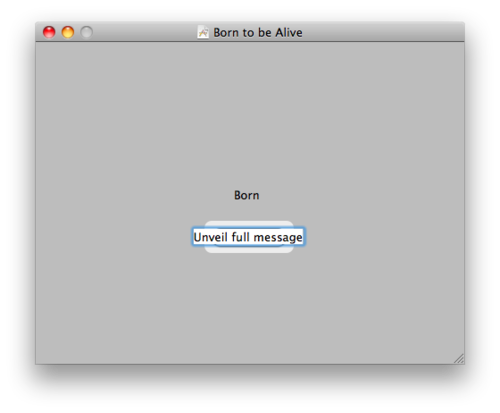
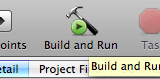
Compiling is not the task of Interface Builder, but the task of Xcode so let’s switch back to Xcode. In the project window, click on the Build and Run button in its toolbar.
After compiling for a few seconds and linking all the dependencies, your new application should launch in your OS X dock, and in particular, the window you just designed should show up.
Clicking on the Unveil full message button doesn’t do a lot though, but that should come as no surprise seeing as we’ve only been designing the interface up to this point. We haven’t yet specified what should happen if one presses the Unveil full message button button.
In terms of Model-View-Controller (MVC) (a separation of concerns design pattern Cocoa relies heavily on), we need a controller to handle this kind of user input.
As mentioned in the previous section, Cocoa was designed with the MVC paradigm in mind. Within this paradigm, we need some kind of controller layer to process the input provided by the user. This input ranges from keyboard events to mouse events. For our intents and purposes, we’re interested in handling mouse events on our Unveil full message button. In order to be able to do that, we need to create a controller that will be able to deal with that.
Also, we may want to process events employed by the user onto the window itself. This would normally require a NSWindowController instance. Taking in mind we want to process events from components within the window as well, we could choose to create a separate controller for these components as well, but that would likely make things overly granular, especially for the simple scenario we’re currently dealing with.
So in place of the latter, we can also just choose to consolidate the ability to process the events of a window and its components all together into a subclass of NSWindowController. This allows us to handle the general case of controlling an NSWindow as well as specify our own actions for handling the components contained by our NSWindow.
To do this, in the Groups & Files panel, expand the BornToBeAlive project as displayed below by clicking on the triangle next to it.
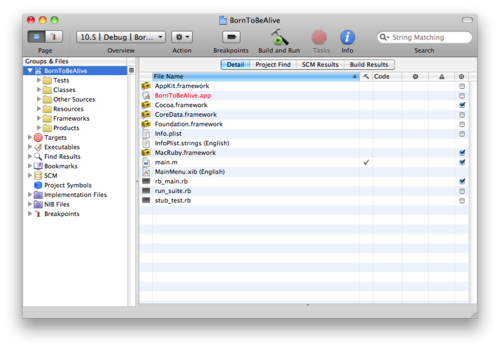
In this expanded project outline view:

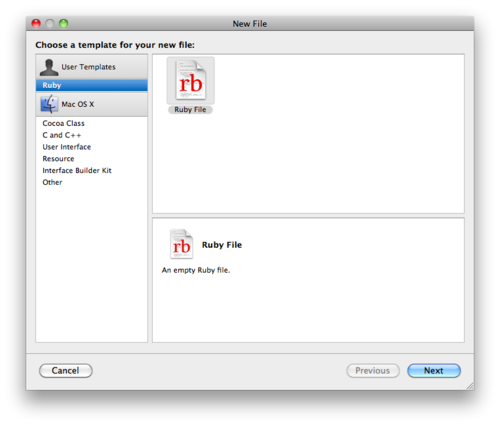
A new window should now appear giving you the options of what kind of new file you would like to add.
This will open up a Save File dialog.
Your window should now look something like this:
As decided upon earlier, we now need to implement our MyWindowController class in a consolidated way such that it can control both the window and the elements contained by that window. We will achieve this by implementing MyWindowController as being a subclass of NSWindowController, and in doing so, specialize the NSWindowController class for our window.
In the code editor, type in:
class MyWindowController < NSWindowController
end
Tres bien! But how do we access the label to modify its value after a user has clicked on the Unveil full message button?
Well, according to the Apple cocoa documentation on NSWindowController, it is capable hold a reference to the window it controls/manages. Instinctively, we assume that through this reference, we could access the elements of the window.
Even though this is kind of true, the NSWindow class was designed for general cases as well and not just our specific window. This means that its design is well composed and that it will be rather tedious to acquire a reference to the element of the window we’re interested in manipulating. Most likely, it will involve a lot of chaining query calls which violates the principle of least knowledge.
To drive the point home, accessing an element in such a fashion in general will look something like: window.view.subviews[0]
A non-food solution to this would be to subclass our NSWindow to hold a direct reference to the elements we’re interested in manipulating, but that would require an assumption in terms of type seeing as our NSWindowController only deals with NSWindow and not OurSpecificWindow.
Taking all this into account, it’s probably just better to give our MyWindowController a direct reference to the element of the window we’re interested in manipulating.
In our particular case, we’d like to change the label’s string value after the user has clicked on the Unveil full message button to show the true message of life. This means we need a reference to the label within our MyWindowController and as such our code listing of MyWindowController now is:
class MyWindowController < NSWindowController
   attr_accessor :my_label
end
In Cocoa, such a reference is usually referred to as an outlet, in our case, representing the metaphor of “being able to plug a label object into the outlet”. C’est bon indeed!
We now need to define the action to be taken when a user has clicked on our Unveil full message button. You might be wondering right now whether or not we also need a reference to the button from within MyWindowController as was the case for the label. This however, is not necessarily the case for us seeing as the button — an instance of NSButton — is an action emitter. More specifically, an NSButton inherits from NSControl and NSResponder allowing it to receive user input (e.g. mouse events) and convert these to action events and dispatch the latter to our code. We may touch base on this subject in more detail in a later article, but for now, suffice it to say that we don’t need such a property reference.
When the button receives a mouse event from the user that is of our interest, i.e. a click event, it will convert this event into a click action and try to dispatch the action message to our code. To that end, the button expects us to provide an object with an action handler method to handle the action on delivery. In Cocoa terminology, this object containing the action handler method is referred to as the target of the button.
An action handler method in MacRuby has a distinct method signature: it is a method with one parameter named sender. It is important to adhere to this rule for action handler methods as Xcode and Interface Builder will only then recognize them as being actions.
Let’s open up our code editor in Xcode for MyWindowController.rb and change the listing to:
class MyWindowController < NSWindowController
   attr_accessor :my_label

   def unveil_full_message_clicked(sender)
       @my_label.stringValue = "42"
   end
end
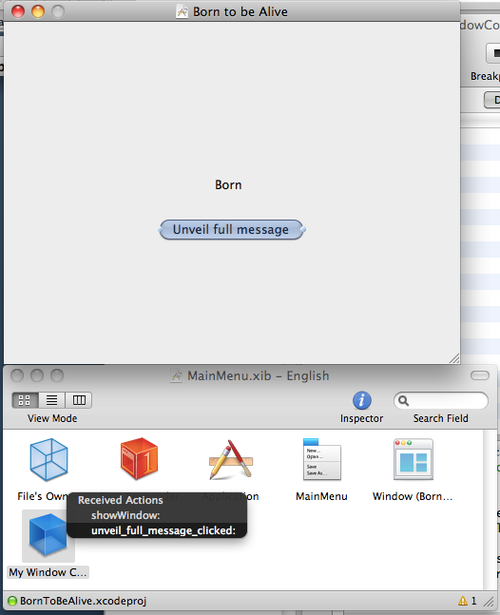
Here, we’ve added the unveil_full_message_clicked action, which will change the stringValue property of our label to the true message of life. Excellent! We’ve now set up all our code, and what remains now is to tell our button to who it should dispatch its action to.
We can setup this target-action for our button programmatic, but Interface Builder provides us with a visual solution for setting these up as well. For the sake of clarity and convenience, the visual solution that we’ll go over with in a few moments enjoys our preference for now.
In the previous sections we’ve gone from designing our window to providing an implementation for our MyWindowController class. They still need to be hooked up to one another however as they are now still disjoint entities that don’t know of eachothers existence. In this section, we’ll describe how we’ll be able to hook these things up visually using Interface Builder.
In Xcode:
As we’ve discussed earlier, objects are stored in a freeze dried manner in our NIB file that get “thawed for use” when the NIB file is loaded again. In this case, we need an instance of MyWindowController to hook it up to our freeze dried window instance.
In Interface Builder in the Library Panel:
In the Inspector panel:
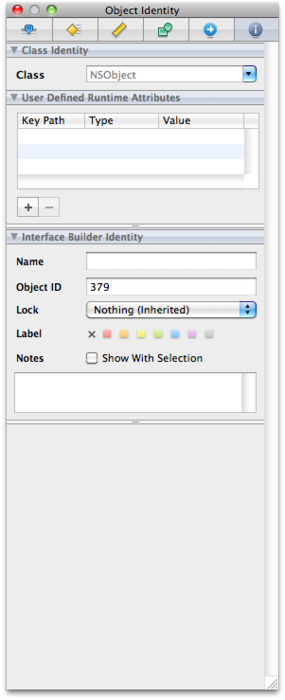
As we can see, the object is of class type NSObject. We need to change this to be MyWindowController to let this object be an instance of that type.
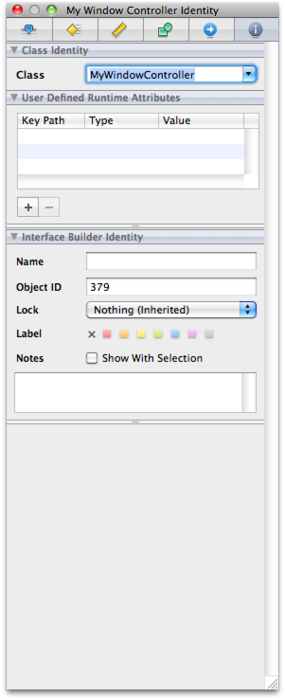
Our object is now of type MyWindowController. Tres bien!
Now that we’ve created a freeze dried MyWindowController object, it’s time to hook it up to our window instance.
Recall from the code listing on MyWindowController that we have defined an accessor — i.e. outlet — for our label, but have not yet set this property. In particular, we need to set the my_label property of our MyWindowController instance to point to the label of our window. In Cocoa jargon, we need to “plug our window’s label into our MyWindowController’s my_label outlet”.
In the MainMenu.xib window of Interface Builder:
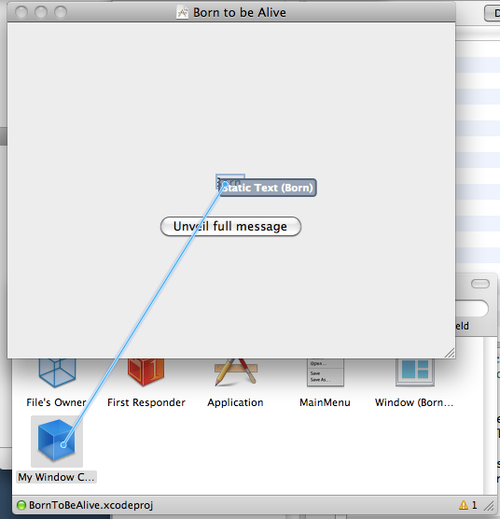
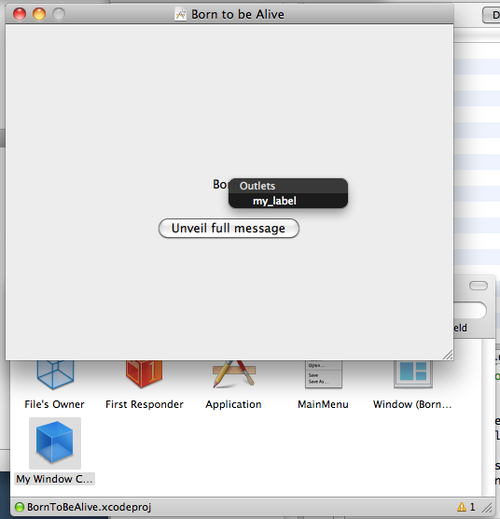
Our MyWindowController now knows what object it should refer to when we use @my_label in MyWindowController. What remains is to set up the target-action for our button to our controller’s action handler method. We’re almost there indeed!
To set the target-action for our button:
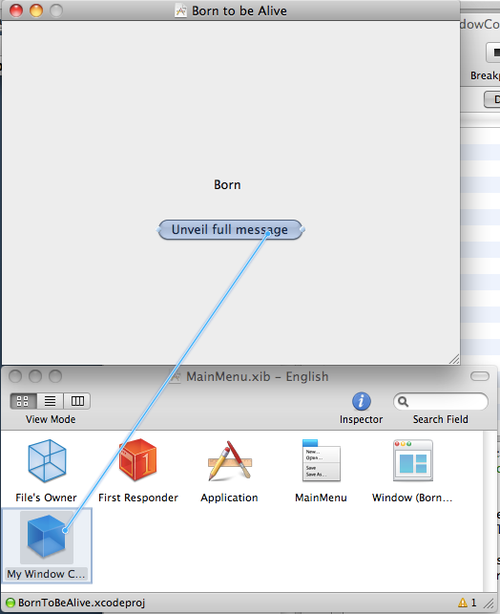
Congratulations, your very first MacRuby application should now be in working order! Go ahead, click on the button to unveil the full message of life!
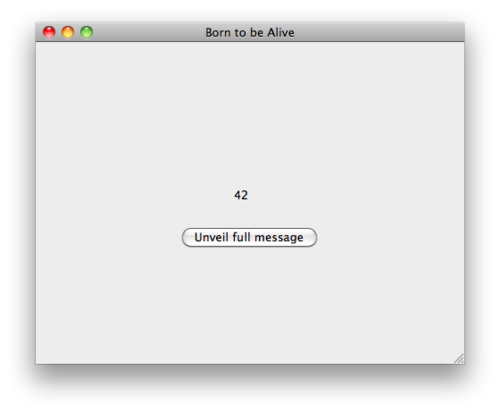
BornToBeAlive MacRuby App Example
For the sake of brevity — something I know is hard to believe looking at the volume of this first tutorial — we’ve omitted a few steps you’d normally like to take into consideration.
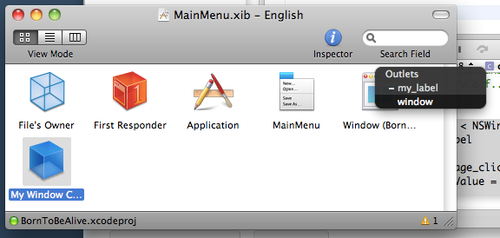
For instance, we’ve not connected the window outlet of MyWindowController (an outlet it inherited from NSWindowController) to our window instance to allow it to manage the window. Connecting this outlet occurs in a similar fashion as was the case with connecting the label outlet by holding down the right mouse button on the MyWindowController instance and dragging it to the window instance.
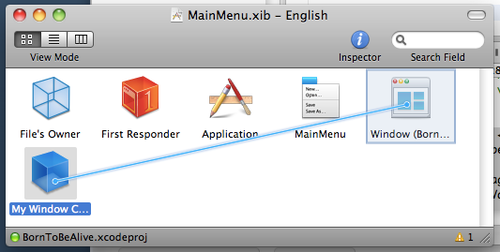
Releasing the right mouse button will display a popup menu outlining the outlets we can connect the window to. Clearly we should select the window outlet here.
http://www.macruby.org/downloads.html
http://blog.phusion.nl/2010/03/12/creating-our-very-first-mac-application-with-ruby-how-exciting/

As you can see, there are three primary concerns you must balance when choosing a data management system: consistency, availability, and partition tolerance.
According to the CAP Theorem, you can only pick two. So how does this all relate to NoSQL systems?
One of the primary goals of NoSQL systems is to bolster horizontal scalability. To scale horizontally, you need strong network partition tolerance which requires giving up either consistency or availability. NoSQL systems typically accomplish this by relaxing relational abilities and/or loosening transactional semantics.
In addition to CAP configurations, another significant way data management systems vary is by the data model they use: relational, key-value, column-oriented, or document-oriented (there are others, but these are the main ones).
Now for the particulars of each CAP configuration and the systems that use each configuration:
Consistent, Available (CA) Systems have trouble with partitions and typically deal with it with replication. Examples of CA systems include:
Consistent, Partition-Tolerant (CP) Systems have trouble with availability while keeping data consistent across partitioned nodes. Examples of CP systems include:
Available, Partition-Tolerant (AP) Systems achieve "eventual consistency" through replication and verification. Examples of AP systems include:
![[Screenshot]](http://www.tracewatch.com/contents/index_images/screenshot_overall.jpg) TraceWatch Real Time Web Stats and Traffic Analysis Lets you keep track of the visitors to your website in real time with detailed statistics and deep analysis using an innovative user interface for FREE and helps you make your website more effective. Can be easily installed on any website supporting PHP and MySQL. You only need to upload some files to your server.
TraceWatch Real Time Web Stats and Traffic Analysis Lets you keep track of the visitors to your website in real time with detailed statistics and deep analysis using an innovative user interface for FREE and helps you make your website more effective. Can be easily installed on any website supporting PHP and MySQL. You only need to upload some files to your server.$ script/console
>> ActiveRecord::Base.logger = Logger.new(STDOUT)
=> #
>> User.first
User Load (3.3ms) SELECT * FROM "users" ORDER BY last_name, first_name ASC LIMIT 1
STDOUT (e.g., the console), via your custom logger instance.
error_messages_for takes a whole bunch of options for customization?
<%= error_messages_for

  :employee,

  :class => "flash error",

  :header_tag => "h4",

  :header_message => "Sorry, the employee couldn't be created" %>
The options for the <div> that is returned include :header_tag, :id, :class, :header_message, :message and more.
Check out the docs on :error_messages_for for more.
environment.rb file (or in one specific environment config file - such as development.rb) to have it turned on permanently:if "irb" == $0
ActiveRecord::Base.logger = Logger.new(STDOUT)
end
gameQuery is a jQuery plug-in to help make javascript game development easier by adding some simple game-related classes. It's still in an early stage of development and may change a lot in future versions. The project has a Google Code page where the SVN repository of the project is hosted and a twitter page where you can follow the daily progress of the development.
Enigmamachine is a video processor which queues and encodes videos according to target profiles that you define. Videos must be on a locally mounted filesystem. The processor takes the path to the video, and executes multiple ffmpeg commands on the video. There is a handy web interface for defining encoding tasks, and a restful web service which takes encoding commands.
Enigmamachine is written using Sinatra, Thin, and Eventmachine.
The jQuery method $.grep() is one of those methods that isn’t used as often as it should be. This is mostly because, until you understand exactly what it does, it can be a bit confusing. Hopefully, this video quick tip will explain when and why you would use it.
At its core, $.grep is a simple little method that will filter through an array and sift out any items that don’t pass a particular control. For example, if we have an array of the numbers 1-10, and want to filter out any values that are below 5, we can do:
var nums = '1,2,3,4,5,6,7,8,9,10'.split(',');
nums = $.grep(nums, function(num, index) {
// num = the current value for the item in the array
// index = the index of the item in the array
return num > 5; // returns a boolean
});
console.log(nums) // 6,7,8,9,10
Or let’s say that you have an array of numbers and strings, and you want to sift out all of the strings, leaving just an array of numbers. One way that we can accomplish this task is with $.grep.
var arr = '1,2,3,4,five,six,seven,8,9,ten'.split(',');
arr = $.grep(arr, function(item, index) {
// simply find if the current item, when passed to the isNaN,
// returns true or false. If false, get rid of it!
return !isNaN(item);
});
console.log(arr); // 1,2,3,4,8,9
For further training, be sure to refer to the jQuery API.
http://net.tutsplus.com/tutorials/php/quick-tip-fully-understanding-grep/
.className{
width:270px;
height:150px;
position:absolute;
left:50%;
top:50%;
margin:-75px 0 0 -135px;
}$(document).ready(function(){
$(window).resize(function(){
$('.className').css({
position:'absolute',
left: ($(window).width()
- $('.className').outerWidth())/2,
top: ($(window).height()
- $('.className').outerHeight())/2
});
});
// To initially run the function:
$(window).resize();
});
You can find a tool for just about anything online, there’s only one problem: they cost money, and in some cases, lots of it! Many online tools offer a free basic package for anyone to use, but these packages are often strictly limited, rendering these tools practically useless until you stump up the cash. In most cases, however, there are free alternatives available, many of which are very, very good indeed.
Below, you’ll find 15 Best Free Online Tools for Web Design and Development. Rather than narrow our focus, we’ve covered various aspects of the design and development process, to include the admin side of freelancing or running a small business.
No two tools listed below perform the same function; we’ve chosen our favorite tool for doing each job. You’ll find the best free online tool for project management, one for invoicing, one for screen sharing, one for instant messaging, one for mocking up layouts, and much more besides.

Redmine is a great, free alternative to other pricey project management apps available online. It does pretty much everything you could possibly desire, albeit in a less polished way than some of its more expensive rivals. With Redmine, you can manage a large number of projects simultaneously, defining personal roles and assigning tasks to specific team members if necessary. You can track time and issues, create Gannt charts and calendars, create project wikis and forums, and manage documents and files.

Billing Boss is a fantastic, free invoicing tool, designed especially for small businesses and freelancers, which lets you send an unlimited number of invoices to an unlimited number of clients, quickly and easily. All of your invoices are saved automatically and catalogued in a logical, understandable way. Billing Boss supports multiple currencies, is integrated with PayPal and is mobile friendly. You can even share your account with your bookkeeper or accountant.

Yuuguu is a multi-platform screen-sharing tool, which allows Windows, Mac and Linux users to collaborate. You can quickly initiate an instant messaging session with a client or team member, sharing each others’ screens at the touch of a button. It’s perfect for working together on document presentations or for writing and editing documents in a group.
With Yuuguu, there’s nothing to download at either end, which means you can start sharing and communicating in seconds. The free Yuuguu package includes unlimited use with other Yuuguu users and 100mins/month use with non-Yuuguu users, as well as up to 5 participants in a single session.

Looking for a quick and easy way to create favicons for your website, then look no further than Dynamic Drive’s excellent FavIcon Generator. It’s effortless to use, just select any image (provided it’s a gif, jpg, png, or bmp) you want to turn into a favicon and press Create Icon. Follow the simple instructions generated to create an eye-catching favicon that will help your website stand out in your users’ favourite lists.

For online storage, look no further than Dropbox, an ingenious tool for storing and sharing files between all of your computers and with other team members. Once installed, a Dropbox folder appears on your computer’s desktop. Drag files into the folder and they will automatically appear in the Dropbox folder on each one of your computers, laptops and smartphones. What’s more, every file is automatically added to another Dropbox folder on the Dropbox website, which is accessible from any computer in the world. Invite associates to access your Dropbox folder, for quick and easy file sharing.

BrowserShots is a straightforward, free tool for checking what your website looks like in a wide range of different browsers. It really couldn’t be simpler to use. All you have to do is enter your website’s URL into the address bar at the top, check or uncheck to select which browsers you would like to get a screenshot from, and press Submit. You can fine-tune your search by screen size and color depth, as well as enabling or disabling JavaScript, Java and Flash.

toggl is the perfect time tracking tool for freelance web developers and designers who tend to get paid by the hour. As an online tool, it’s available from anywhere, which is great for those of us who frequently work away from the office. As well allowing you to create projects and start timing in a few clicks, toggl produces performance charts and other reports for you and your whole team to analyze. Toggl can be embedded in iGoogle, Netvibes and Gmail so that you can share your performance with others. It’s free for up to 5 users.

Google Docs is an online word processor and spreadsheet tool that’s free to everyone with a Google account. It works in much the same way as Microsoft Word, offering similar features in the form of multiple fonts, font sizes and colors, page numbering, bullet points, alignment, tables and spacing etc. It does not, however, offer headers and footers, footnotes or a powerful find and replace feature, which some people simply can’t live without.
The best thing about Google Docs is that it works seamlessly with Word, so you won’t have to worry about compatibility issues when working as part of a team. Google Docs really comes into its own when it comes to collaboration, however. Press the Collaborate tab to work on a document with several people at once.

mockingbird is a wonderfully useful tool, which lets you create mockups of websites in minutes. Simply drag and drop user interface elements into mockingbird, rearranging and resizing as you go to create a perfectly balanced page. You can add as many pages as you like, linking them all together to show clients or associates how users might navigate through your site.
Once you’ve created and saved a mockup, mockingbird issues you with a link which you can share with other people, or an embed code so that you can embed a mockup in your own website. It’s a lightweight tool with few features (there are, for instance, no templates to follow), but this makes it really quick and easy to use.

If you find choosing colors tricky, then take a look at kuler, a fully database driven Flash site created by Adobe Labs. With kuler, you can choose, create, modify, mix and match colors to your heart’s content, for free of course, until you happen upon the perfect color scheme for your website. Not only can you create your own color swatches, complete with RGB and HEX codes, you can save them and download other peoples’ swatches too. You can even extract color palettes from illustrations and photographs, uploading them or selecting them on Flickr. Once you’ve chosen the ideal color pallet, you can download it for use in Adobe Creative Suite.

Bespin is a browser based code editor which attempts and succeeds to match the quality of traditional desktop editors. It offers standard editing features, as well as syntax highlighting, support for large files, undo/redo, preview files in browser and import/export projects. Bespin not only gives you access to your entire coding environment from any computer, it lets you collaborate in an effortless way, without the need for firewall configuration. Tweak away to your hearts content by using various plugins until youve created the perfect editor for you.

Pingdoms Full Page Test imitates the way a web page is loaded in a browser, showing you exactly how long it takes for each object, including images, CSS, JavaScript, RSS, Flash and frames, to appear. The load time of each object is shown as a series of colored bars for quick and easy visual comparison. Order each object into a hierarchy to identify any problem areas. The Test also uncovers useful, general stats, such as total number of objects and total load time.

If youre stuck on a computer without an FTP client, you should use net2ftp. Its a free, web based FTP client which features all the standard FTP functions youd expect as well as various other features, including the ability to extract files and directories and download a selected group of files or directories as an archive. There are numerous plugins available to enhance your net2ftp experience and its integrated with Drupal, Joomla, Mambo, XOOPS and other Content Management Systems.

If youre stuck on a computer without an FTP client, try net2ftp. Its a free, web based FTP client which features all the standard FTP functions youd expect as well as various other features, including the ability to extract files and directories and download a selected group of files or directories as an archive. There are numerous plugins available to enhance your net2ftp experience and its integrated with Drupal, Joomla, Mambo, XOOPS and other Content Management Systems.

Looking for a solid image editor that doesnt cost an arm and a leg? Available in 13 languages, Pixlr provides a great, free alternative to Adobe Photoshop. Of course, it offers nowhere near the same level of functionality or performance, but you wouldnt expect it to. It can, however, handle most editing that designers do on a day-to-day basis. You can use layers and an array of filters and effects.
http://www.webappers.com/2010/03/09/15-best-free-online-tools-for-web-design-development/

